Jmol: a molecular graphics viewer
Written by Helen White
A program we will be using in this course is
JSmol which is also freely available. It is the lastest version of JSmol which avoids the need for java in webpages. JSmol was a Java version of Rasmol allowing rasmol like function within a web page.
Like RasMol, it allows you to
rotate protein structures, zoom in on them, render them in different ways and using
various colouring schemes, label atoms and residues, and so on, as well as
exporting your structure in a number of graphical formats.
JSmol should work for the pictures within the browser including on Android and iPbone/iPad. However, if you want to make your own pictures, you
will have to install Jmol on your own computer.
Installing Jmol on your computer
Jmol
can be obtained from the following link to the
Jmol website.
In the heading, you will find a number of options, including Download. Click on this to
go to the Jmol download page where the link to download the latest version of Jmol can be found.
An extensive operating manual can be found by clicking on the documentation and
demonstration pages links
found on the Jmol home page. Instructions can also be found under the help
when you are running the program. You may also want to do a Browser Check (found as a
link on the top of the Jmol homepage).
To help familarise you with this program, we will go through a few basic commands.
Reading in the coordinates
The following link contains the 3D coordinates of a protein structure (in PDB format).
These coordinates are the same as those used in the RasMol example.
 PDB file (1a07.pdb, Note it is zero not the letter O)
Handy hint: To download the above file don't just
click on the above link. Press the SHIFT key down and then click
on the link. You will then get the usual dialogue box asking where
to save the file. Under Windows you may need to right-click on the
link.
The protein, in case you're interested, is the SH2 domain of a tyrosine
kinase and consists of two chains and a bound ligand (search for
1a07 in the PDBsum database).
Once you have the coordinates on your disk, Jmol can be started. Once the Jmol window is
on your screen click on the File button on the toolbar and you will see a
number of options:
-
New - allows you to open a new window
-
Open - allows you to search for the directory where you have your pdb file, and then
click on it to read it in. This can also be done by clicking on the first icon underneath
the tool bar
-
Open URL - allows you to read a pdb file directly from a URL
-
Export - allows you to export your picture to JPG, PNG or PPM format
- Script - opens a window where you can use RasMol commands to give a more specialised
selection of atoms, residues or chains than with the mouse
- You can also print, close and exit the program.
Read in the pdb file you have downloaded (use the option "Open" mentioned above)
and investigate what you can do with the mouse.
-
the left hand button will let you rotate your molecule
- the middle button will let you zoom in and out
- the right hand button will bring up viewing commands
Now investigate some different methods of displaying the molecule. Note: During the course you will find may
Jmols incoporated within the text. You can use the right hand mose button and the commands below to manipulate them.
- Click on the right hand mouse button and a menu will come up, go down to Style, slide
the mouse across to Scheme, and then across to CPK Spacefill. Repeat
the process but try the other options for display i.e. Ball and Stick, Sticks,
Wireframe. You should obtain pictures like those in Figure 1.
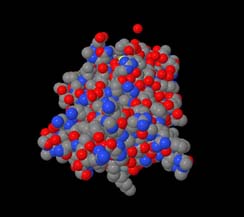
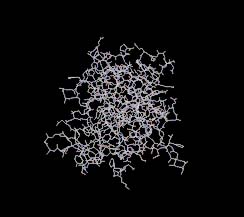
Figure 1: 1A07 displayed using CPK spacefill (left) and wireframe (right)
For the rest of the time the above commands will be shown in
the form Style - Scheme - CPK Spacefill.
Sometimes we do not want to look at all the atoms, for instance we may want to see the
secondary structural elements in more detail.
So far the pictures have been very dull, but we can add colour to illustrate different aspects.
One common method of display is by viewing the secondary structural elements, where the
default colours are red for helices, yellow for beta-strands and white for the rest. We can
do this easily in Jmol.
-
Load in you pdb file as previously
- Do the commands Style - Structure - Cartoons
- Switch off the atoms and bonds as previously.
- Use the right hand mouse button and go down the menu until you reach Colour. Then
select Cartoons. In the third column that appears choose By Scheme. This
will then bring up the possible colour schemes. Amino will colour by amino acid, so
that you will end up with a multi-colour display. Secondary Structure will colour by
helix and sheet, while chain will colour by chain. This is very useful when a protein
consists of more than one chain.
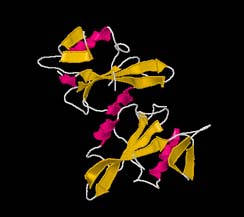
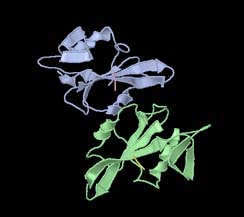
Figure 2: 1A07 represented as a cartoon, coloured by secondary structure(left) and chain (right)
These colour schemes can also be used in the display of atoms and bonds. Now try -
Style - Atoms - 15% vander Waals
- Style - Bonds - On
Don't forget to switch off your "cartoon" if you still have it on.
- Colour - Atoms . You can try By scheme or by the different colours. If
you choose to colour Yellow for instance, you will have to select the shade of
yellow you want from the fourth column.
So far we have looked at a complete molecule, but we are also able to display specific
items. Try the following:
- Open your pdb file file - open then give filename
- use the right hand mouse button to obtain a menu
- Style - Scheme - Wire Frame
- Colour atoms - White.
We are now going to colour specific types of residues.
- use the right hand mouse button to obtain a menu
- Select - Protein - Basic Residues (+)
- Colour - Atoms - By Scheme - Amino.
This will display the positively charged residues in blue
You can also now add the negatively charged residues by
- Select - Protein - Acidic Residues (-)
- Colour - Atoms - By Scheme - Amino.
An interesting display can be made of the whole molecule coloured by atom, using CPK.
This is achieved by
- Select - All
- Style - Scheme - CPK spacefill
If you follow the above scheme, you should obtain the picture shown in Figure 3.
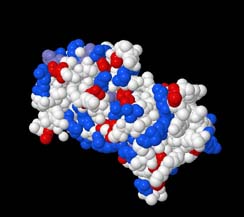
Figure 3: A Spacefilled representation of 1A07. The positively charged residues
are coloured blue, the negatively charged residues are red. All other residues
are white.
You may be interested where all Tryptophan side chains are located. This is simple
to achieve. A possible example can be obtained as follows:
- Open your pdb file file - open then give filename
- Display your molecule as a backbone or trace (Style - Structures - Backbone or
Trace.
- Select the residue you are interested in (Select - Protein - By Residue Name -TRP)
-
You can colour the atoms (Colour - Atoms, then choose By scheme or a specific
colour)
You can choose the type of display you want for these selected side chains. This can
be done in a number of ways -
Style - Scheme followed by one of the choices e.g. sticks
- Style - Atoms then choose a vanderwaals radii. Also Style - Bonds
and choose a width
- You can also have the atoms switched off and just display the bonds (Style -
Bonds) then choose a width
Many pdb files, such as 1A07.pdb have water atoms and/or ligands. Jmol also allows
us to manipulate these. Try the following:
- Open your pdb file file - open then give the filename
- Select - Protein -All
- Style - Structures - Trace
- Style - Atoms - Off
- Style - Bonds - Off
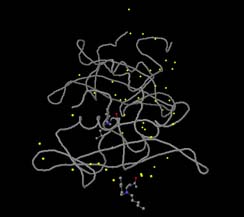
We are now going to manipulate these "hetero" atoms
- Select -Hetero -Water will select only the water atoms, so the program will
apply all future commands only to these atoms.
- Colour - Atoms - Yellow -Yellow should change all the water molecules to yellow,
as shown in the next picture
- Style - Atoms -Off will switch off all the water molecules
There are more menu options available which you should try
- label - where you will find different label types and positions
Hint: If you leave the cursor on an atom for a few seconds, the atom
label will show.
- spin - you can vary the spin rates in each direction
- In the colour option you can select background to change the background
colour. Of course, if you change the background colour, you may have to change some
of the colours that you used in your molecule in order to give a good contrast.
If you return to the Jmol website and click
on the Demonstation pages to see
further capabilities of the program.
Wikipedia also has links to other sites featurng Jmol explantaions.
Copyright © Birkbeck College 1996-2015